0%

Scrapy 学习笔记

原理

scrapy

名词解释:

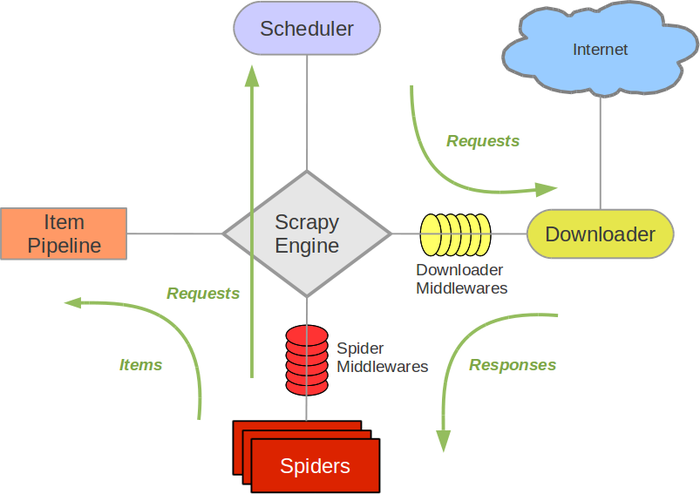
Scrapy Engine:引擎,负责不同组件的通信。

Scheduler:调度器,接受引擎发来的 Request 请求,并整理入队出队。

Item Pipeline:管道,处理从 Spider,并进行处理。

Spider:爬虫,处理 response,分析提取出数据,获取 Item 所需的字段。

Downloader:下载器,下载引擎发出的 request 请求

Downnloader Middleware:下载中间件

Spider Middleware:Spider 中间件

流程:

Engine 将 spider 处理的首条 request 通过调度器入队,再将处理好的 request 传给下载器,下载器再将下载好的东西传回引擎。引擎再把下载好的东西传到 Spider,Spider 处理之后,得到 item 以及下一个 url,最后引擎把 item 传给管道,url 再传给调度器再次循环。

创建使用

  • 创建一个 scrapy 项目,scrapy startproject projectname
  • 创建一个爬虫,scrapy genspider spidername domain # domain 指域名
  • 运行爬虫,scrapy crawl spider
  • 保存,scrapy crawl spider -o json/csv/xml/

其它设置:

  • items.py 设置 item 字典的取值。
  • settings 设置 ITEM_PIPELINES 的值,一般取消注释即可。
  • 设置下载延迟 DOWNLOAD_DELAY。
  • 设置请求头 DEFAULT_REQUEST_HEADERS。

Scrapy Shell

使用 scrapy shell "https:www.zhihu.com"

CrawlSpider 类爬虫

创建, scrapy genspider -t crawl zhihu 'zhihu.com'

Link Extractors,提取链接。每个 LinkExtractor 有一个公共方法是 extract_links(),接收一个 Response 对象,返回一个;scrapy.link.Link 对象

Scrapy 登录

  1. 使用 cookie
  2. 提供 post 的数据
  3. 首先发送页面的 get 请求,获取页面登录必须的参数,比如 zhihu.com 的_xsrf,然后和账户密码一起 post 到服务器,登录成功。

scrapy.Formrequest.from_response()这个方法自动找到表单进行登录……

反反爬虫

  1. 动态设置 user-agent;
  2. 禁用 cookies,不需要用到 cookies 的地方就禁了它。通过 COOKIES_ENABLED 控制 CookiesMiddleware 的开启或关闭;
  3. 设置延迟下载;
  4. Google 和百度的 cahe。比如百度快照会把相关的数据存在百度服务器上,绝对安全,但是没有图片和视频。
  5. 使用 ip 地址池
  6. 使用专门的爬虫代理组件,不过得加强。

logging 模块的使用

  • scrapy

    • settings 中设置 LOG_LEVEL = “WARNING”

    • 在 settings 中设置 Log_FILE = “./a.log”

      设置日志保存的位置 ,设置后终端不会显示日志内容

    • import logging 实例化 logger 的方式在任何文件中使用 logger 输出内容

  • 普通项目中

    • import logging

    • logging.basicConfig(……)

      设置日志输出的样式以及格式。

    • 实例化一个 logger = logging.getLogger(__name__)

    • 在任何 py 文件中调用 logger 即可

##  scrapy-redis

先用正常的 scrapy 框架编写,最后再在 settings 添加几个参数即可使用 scrapy-redis 爬取。

settings.py 配置:

1
2
3
4
5
6
7
8
9
10
11
12
13
14
15
16
17
18
19
20
21
22
23
24
25
26
27
28
29
30
31
32
33
34
35
36
37
38
39
40
41
42
43
44
45
46
47
48
# 指定使用scrapy-redis的Scheduler
SCHEDULER = "scrapy_redis.scheduler.Scheduler"

# 在redis中保持scrapy-redis用到的各个队列,从而允许暂停和暂停后恢复
SCHEDULER_PERSIST = True

# 指定排序爬取地址时使用的队列,默认是按照优先级排序
SCHEDULER_QUEUE_CLASS = 'scrapy_redis.queue.SpiderPriorityQueue'
# 可选的先进先出排序
# SCHEDULER_QUEUE_CLASS = 'scrapy_redis.queue.SpiderQueue'
# 可选的后进先出排序
# SCHEDULER_QUEUE_CLASS = 'scrapy_redis.queue.SpiderStack'

# 只在使用SpiderQueue或者SpiderStack是有效的参数,,指定爬虫关闭的最大空闲时间
SCHEDULER_IDLE_BEFORE_CLOSE = 10

# 指定RedisPipeline用以在redis中保存item
ITEM_PIPELINES = {
'example.pipelines.ExamplePipeline': 300,
'scrapy_redis.pipelines.RedisPipeline': 400
}

# 指定redis的连接参数
# REDIS_PASS是我自己加上的redis连接密码,需要简单修改scrapy-redis的源代码以支持使用密码连接redis
REDIS_HOST = '127.0.0.1'
REDIS_PORT = 6379
# Custom redis client parameters (i.e.: socket timeout, etc.)
REDIS_PARAMS = {}
#REDIS_URL = 'redis://user:pass@hostname:9001'
#REDIS_PARAMS['password'] = 'itcast.cn'
LOG_LEVEL = 'DEBUG'

DUPEFILTER_CLASS = 'scrapy_redis.dupefilters.RFPDupeFilter'

#The class used to detect and filter duplicate requests.

#The default (RFPDupeFilter) filters based on request fingerprint using the scrapy.utils.request.request_fingerprint function. In order to change the way duplicates are checked you could subclass RFPDupeFilter and override its request_fingerprint method. This method should accept scrapy Request object and return its fingerprint (a string).

#By default, RFPDupeFilter only logs the first duplicate request. Setting DUPEFILTER_DEBUG to True will make it log all duplicate requests.
DUPEFILTER_DEBUG =True

# Override the default request headers:
DEFAULT_REQUEST_HEADERS = {
'Accept': 'text/html,application/xhtml+xml,application/xml;q=0.9,image/webp,*/*;q=0.8',
'Accept-Language': 'zh-CN,zh;q=0.8',
'Connection': 'keep-alive',
'Accept-Encoding': 'gzip, deflate, sdch',
}

改成 redis 运行

先把 spider 文件继承的类改为 RedisCrawlSpider,再把 start_urls 注释掉,添加redis_key = "yyspider:start_urls",再添加动态获取(可选):

1
2
3
4
5
def __init__(self, *args, **kwargs):
# Dynamically define the allowed domains list.
domain = kwargs.pop('domain', '')
self.allowed_domains = filter(None, domain.split(','))
super(YySpider, self).__init__(*args, **kwargs)

最后,在对应的文件夹 scrapy runsipder yy.py运行相对应的文件名。

然后在相对应的 redis 上,执行 lpush yyspider:start_urls http://www.youyuan.com/find/guangdong/mm18-25/advance-0-0-0-0-0-0-0/p1/

yy.spider 类例子:

1
2
3
4
5
6
7
8
9
10
11
12
13
14
15
16
17
18
19
20
21
22
23
24
25
26
27
28
29
30
31
32
33
34
35
36
37
38
39
40
41
42
43
44
45
46
47
class YySpider(RedisCrawlSpider):
name = 'yy'
allowed_domains = ['youyuan.com']
# start_urls = [
# 'http://www.youyuan.com/find/guangdong/mm18-25/advance-0-0-0-0-0-0-0/p1/']

redis_key = "yyspider:start_urls"
# 第一级匹配
page_links = LinkExtractor(allow=(
r'youyuan.com/find/guangdong/mm18-25/advance-0-0-0-0-0-0-0/p\d+'))
# 第二级匹配
profile_links = LinkExtractor(allow=r"youyuan.com/\d+-profile")

rules = (
Rule(page_links),
Rule(profile_links, callback='parse_item', follow=False),
)

def __init__(self, *args, **kwargs):
# Dynamically define the allowed domains list.
domain = kwargs.pop('domain', '')
self.allowed_domains = filter(None, domain.split(','))
super(YySpider, self).__init__(*args, **kwargs)

def parse_item(self, response):
item = YouyuanItem()
item['username'] = self.get_username(response)

item['age'] = self.get_age(response)
item['avatar'] = self.get_avatar(response)
item['images_url'] = self.get_images(response)
# 个人独白
item['content'] = self.get_content(response)
# 地址
item['addr'] = self.get_addr(response)
item['education'] = self.get_edu(response)
item['hobby'] = self.get_hobby(response)
# 个人主页
item['url'] = response.url
# 来源
item['source'] = 'youyuan'

#item['domain_id'] = response.xpath('//input[@id="sid"]/@value').get()
#item['name'] = response.xpath('//div[@id="name"]').get()
#item['description'] = response.xpath('//div[@id="description"]').get()

yield item
------------ 感谢你的阅读 ------------